MYT CR8TiV

A Place to Enhance and Inspire to be CR8TiV !

Chromatix are Chroma-tastix !!

chromatix beauty shot

Hi, Everyone ! This is a Part 2 to my previous review on the Chromatix markers. So far I have been using them for a few stamped card images but also trying them out on Coloring books. These markers definitely are comparable to Promarkers. The color layout is so smooth like Promarkers and they hide your marker strokes very well. But mostly they are AWESOME for Coloring books.

One thing I will have to note is that they do bleed so try not to color too close to the line or it will bleed over the edge of that line. Here are two(2) coloring book examples I did using the Chromatix markers. One is a regular Children’s coloring book with the brown flimsy paper and the other is a page from an Adult Coloring Book.

12980384_10156718679065307_2071645320_n

Example #1 : Children’s Coloring Book page

Look how smooth the Chromatix color is laid down. I don’t think anyone would believe me when I say it was done in marker. Most markers like Crayola will bleed terribly on these coloring book pages but the Chromatix do bleed out but if you’re careful it’s not noticeable.

12968698_10156718678950307_539999759_n

Example #2 : Adult Coloring Book page

I just love how smooth the color looks. They work great for both coloring pages !! One important tip is to place a sheet of cardstock behind the page you are coloring as the color will show through the other side “bleed”. If you have those coloring books where it’s double-sided make a copy of the other side of the page so you can still color it. With the Children’s coloring book I picked a page that the other side just has a maze, puzzle or something that won’t be wasted.

If you like Promarkers I really recommend trying these markers out and if you are into the Coloring book craze add these markers into your coloring palette. I am sure you will not regret it ! I love these markers !! They don’t smell very strong, colors smoothly, blends well, and gives you a good variety of colors to chose from. I prefer just using them straight without blending with the blender marker but really give these markers a try !!

Leave a comment »

Chromatix .vs. Promarker …

chromatix beauty shot

Hi, CR8TiV Cats ! Happy Monday ! (∩u∩) Today I want to share my review of the Chromatix blending marker set. I found a 30 color set for $29.99 at Marshalls and intrigued to give them a try. Here is what the entire set looks like arranged in ROYGBIV order …
12966572_10156713022600307_205920352_nI just love how pretty the rainbow order looks ! (♥⌂♥) The markers have a Brush tip and a Fine tip kinda like the Spectrum Noir Aqua markers I recently blogged about. Some compared these markers to Copics but I think they more feel like Promarker-ish than Copics.

I tested them out on the cardstock I normally use for card bases and artwork. One tip I highly suggest whenever you buy any set of markers is to make a swatch of the colors. These Chromatix markers don’t have color numbers or names and the cap color is not accurate to the actual color so a swatch for this is a MUST-HAVE. Below is the swatch I created. I used a solid heart stamp to see how it’ll look if used with stamps and also colored a block above to see the actual color.
12980666_10156713022465307_1814858463_n

They bleed very easily on any type of paper it seems. Also getting colors to blend together was sorta difficult. They didn’t blend together too well but if you stick with the general LMD “Light-Medium-Dark” rule of blending these markers will work well. If you look at the swatch it looks like each color is in sets of three(3) or four(4) colors of the same spectrum. So it’s quite easy to pick out a Light Blue, Medium Blue, and Dark Blue to do a blending Ombre.

As far as the Blending marker that comes in this set it doesn’t seem to work very well. If you look in the lower left corner of the color swatch photo I used the Chromatix blender marker, a Q-Tip with Rubbing Alcohol, and a Promarker Blender marker. Oddly the Promaker blender marker turns to a yellow-ish color. I dunno if you can see it in the photo but it has streaks of yellow. The Q-Tip dipped in Rubbing Alcohol seems to blend it very well.

I haven’t tried the Distress markers but the barrel of the marker looks a lot like the Distress markers but these markers compare to Promarkers like if Promarkers had made a skinny version of their markers these are what they feel like. The ink flows out the same and the color layout is very similar to them as well. I’ll color a coloring book page and psot them up on Instagram to show you how they work for coloring books.

If you are going to use them to color stamps just a fair warning they will stain your stamps. My clear heart stamp I used for the color swatch turned yellow in color and won’t clean back to the clear color it once was. But it will still stamp and work like normal just stained a yellow color. Overall I think this is a great set to have when you want to learning about blending colors and just a set for coloring coloring books with.

Leave a comment »

Stamp & Scrapbook Expo …

images

Hello, Everyone ! Hope you are having a great weekend ! Aside for the rain these past few days it’s been a great week and the weekend has started off pretty positive as well. Today I attended the Stamp & Scrapbook Expo at the Anaheim Convention Center and if you noticed I scratched out the Stamp from Stamp & Scrapbook Expo.

The Expo was great and there were so many inspiring projects but there weren’t too many stamp vendors to really validate the Stamp part of the Stamp & Scrapbook Expo. It seemed more Scrapbook oriented. Stamp companies where are you ? Definitely need more stamp companies like LawnFawn, HeroArts, MamaElephant, Ellen Hutson, My Favorite Things, Avery Elle, etc. More stamp companies need to register for this expo so that the name of Stamp & Scrapbook can live up to it’s name.

I mainly shopped the most at the Stamps of Life booth but to be honest everything was pretty expensive. $120 dollars dissolved so quickly and not much freebies either. This was my first time attending a Expo specifically for Stamps & Scrapbooking but I’ve attended other Expos such as the Japan Expo which my Dad did a few shows at and when the LA Auto show rolls in town we try to go check it out.

Often times from attending those Expos we go home with a tote full of freebies like keychains, lanyards, magnets, pens, etc. I was kinda expecting more from this Stamp & Scrapbook Expo to give out more freebies but only freebie I got was a glue stick and a ink pad from the Stamps of Life booth for my purchases. I really hope that next year more stamp companies step up to the plate and give the Stamp part of Stamp & Scrapbook Expo more meaning.

Now on to the review part … Like I said above I spent most of my money @ the Stamps of Life booth since they were pretty much the only worthy stamp selling booth aside from Judith’s rubber stamps. Which were priced pretty reasonably ! I bought two(2) flower stamps for about $15.

But my review isn’t about that stamp. My review is about the Stamps of Life ink pad. They are made by Color Box under the Stephanie Barnard brand. I picked out the color Candy which is a soft cotton candy pink color. The ink pad is really great !! It stamps very clean and clear with no smearing or smudging. The color is also very vibrant ! I could see myself buying more of her ink pads in the future.

As for the stamp sets I purchased … I cannot say how much I adore the Stamps of Life stamps. If you read my previous blog post about her subscription plan if you haven’t subscribed yet … do it ! Every month is like Christmas when you go to your mailbox and find her monthly stamp set awaiting in your mailbox.

Her stamp sets always stamp beautifully without requiring any priming. What I mean when I say Priming is sometimes *new* stamps don’t take ink very well and either you have to rub a pink eraser over the image so that it will scuff and make ink adhere better.  Works like a charm every time !! But with the Stamps of Life stamps you don’t need to take that extra step. Just ink up and stamp away !!

I also bought some dies which I am eager to try as well. I purchased the Stitched Rectangles die and the Grid die set which I will definitely post up a card made with these dies soon. So stay posted on my Facebook page @ Facebook.com/MYTCR8TiV or follow me on Instagram @MYTCR8TiV

Leave a comment »

Copic markers on a budget + Memento .vs. VersaFine !

Hi, Everyone ! Hope you’re having a wonderful weekend. Today I wanna share with you the Spectrum Noir Aqua markers and also share a ink pad comparison between the Memento ink pad and the VersaFine which are both made by Tsukineko but equally different. So let’s start with the ink pad comparison first.

Below is a comparison example I made. Memento ink is on the left and VersaFine is on the right. It says that VersaFine is best for Fine Detail stamping. The stamped impression definitely is darker and more crisp than the Memento ink but my Memento ink pad is pretty worn but I keep it inked. I think VersaFine does give you a better impression with better clarity in detail.

12919185_10156676317430307_1983430779_n

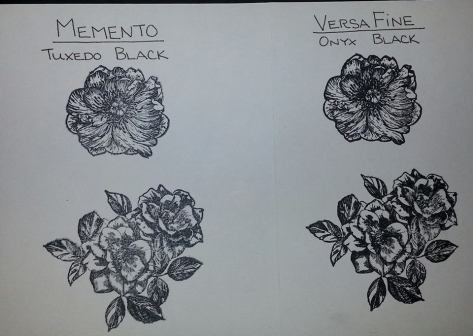
Even when my Memento ink pad was *new* I remember some clear stamps the impression was a bit hazy looking like in the picture sample above. The clear stamps I used  are fairly *new* and only been used once before this. I think I’ll be using the VersaFine more often when I want clearer stamped images or using a stamp that has lots of detail in them.

Now on to the Copic markers on a budget. I just purchased these markers called Spectrum Noir Aqua markers which are water-based. I didn’t seem to get them to work with a water brush too well although I have seen tutorials on YouTube where they have watercolored with these markers. I prefer to use them straight as markers.

I had purchased one copic marker using a coupon from Michaels. It’s RV11 which is a very soft cotton candy pink color which I use for coloring cheeks on characters. I was in Love with the copic marker and wished … No wait dream to own all the Copic marker colors. But unless I won the lotto that’s not gonna be an easy dream to achieve.

I know I’ve been told I can just buy them one by one using coupons but I don’t have the patience to buy one by one. 😛 Now I came across these Spectrum Noir Aqua markers at my local JoAnn’s store. The idea of watercolors + markers intrigued me and since I had a 50% off coupon they were only $15 compared to $29.99 regular price.

zprd_14574008a

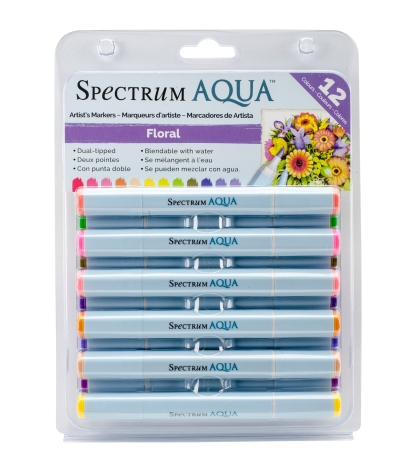
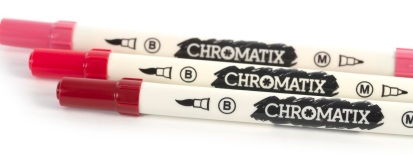
I had originally only purchased one(1) pack which is the Floral set which includes a pretty nice variety of colors but it was missing Blues. Blue is my favorite color and it’s a color I tend to reach for most often. So I went back and bought the Primary set which has Four(4) shade of Blue. Unlike the Copics these markers do not have a Chisel nib. It has a Brush nib like the Copics and a fine point nib which I like better than the Chisel tip.

Below I made a color swatch chart for you guys to see the colors as they really are. The colored caps on the markers aren’t accurate to what the real colors are. One that kinda bugs me but no too much is the fact that the colors are really close to each other that it kinda seems like you’re getting doubles of some colors. Like the Rose Pink and Blossom are real similar. You can actually get the Rose Pink color by layering Blossom on top of each other.

12959300_10156676317800307_921022949_o

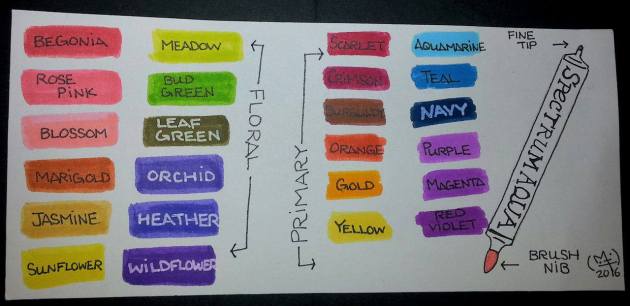
The same goes for the Primary set. Scarlet and Crimson are too similar in color along with Magenta and Red Violet, Orchid and Heather, Jasmine and Gold, Sunflower and Yellow, etc. If you look at the two(2) sets … Floral and Primary you’d think you got doubles of the color just under different names.

I like the fact that I know have a pretty decent ROYGBIV Spectrum of colors to work with. I honestly can say these perform just as well as Copic markers and to me they make great Copic beginners markers to practice Copic techniques until you can graduate and afford the actual Copic markers. But if you’re on a impossibly tight and limited budget like myself where having a large stash of Copics doesn’t seem possible then these are really the budget friendly replacements. Plus you don’t really need a Copic Blender marker or any blender marker since these are Spectrum Noir Aqua Water-based markers. All you need is water and a paintbrush or a water brush.

I’ll give the watercoloring attempt another try. But when I last tried it didn’t seem to pull any color and I was using the Pentel Aquash waterbrush. I’ll try using a regular paintbrush and see if that works better. Overall I really like these Spectrum Noir Aqua markers. I think with my next coupon I’ll try getting a set of the regular Spectrum Noir markers. JoAnn’s carries the six(6) pack but they’re only in single color sets. So Six(6) shades of Reds or Blues or Purples or Greens or Greys. I’m interested in the Blues, Pinks, and Turquoise set since they are colors I use most often.
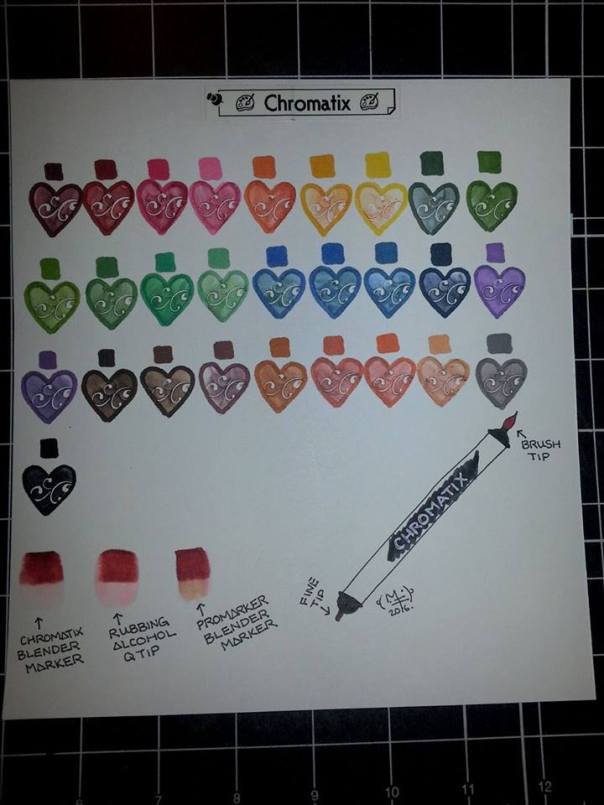
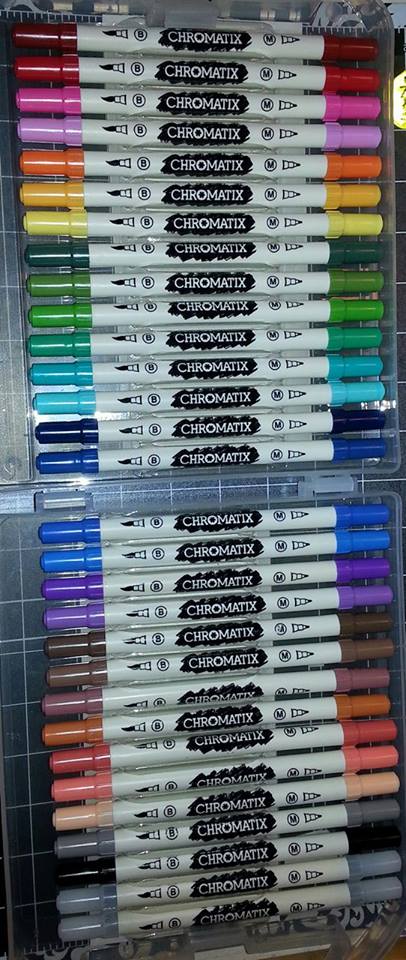
 

Leave a comment »